
Why Dormer Flashing Is the Most Likely Place Your Willowick Roof Will Start Leaking
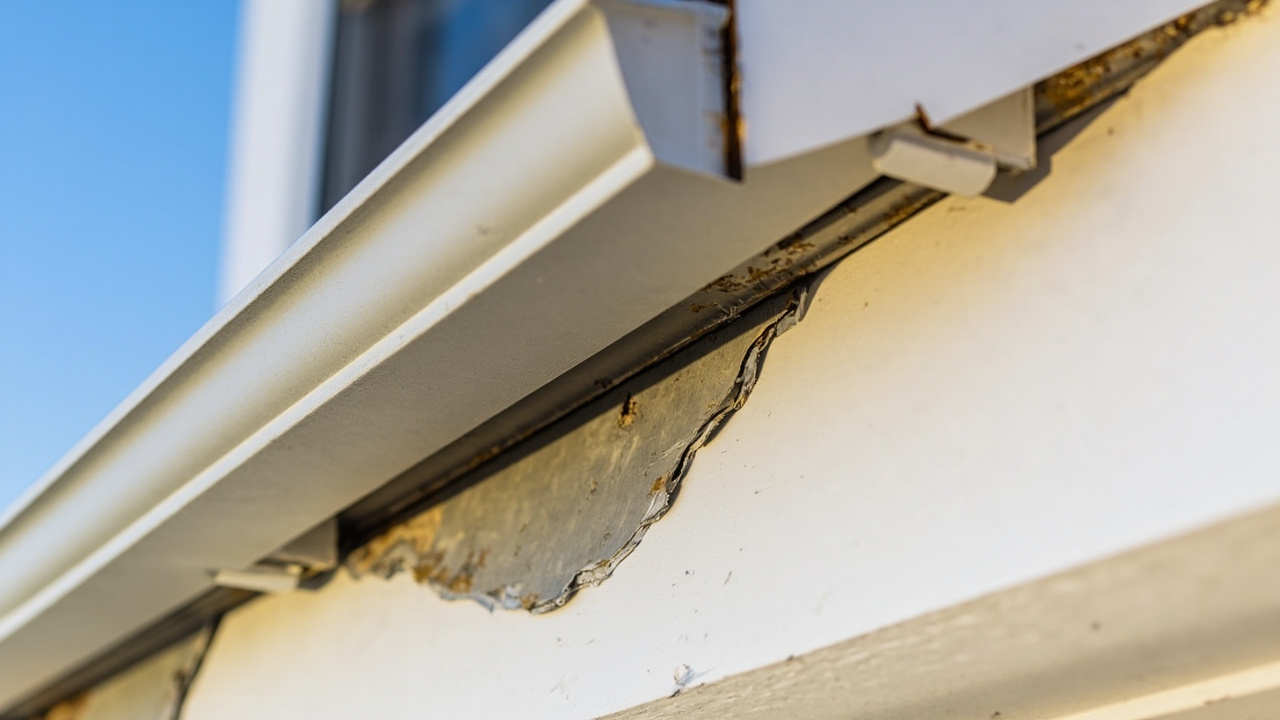
Dormer flashing fails more often than any other part of your roof. The valleys where dormer walls meet the main roof collect ice and water. This creates the perfect conditions for leaks. In Willowick and surrounding Cleveland suburbs, homeowners see this problem every winter.
Water finds the weakest point. Dormer flashing connects two different roof planes. It handles more stress than flat sections. Temperature changes make materials expand and contract. Over time, this movement breaks the seal. Once water gets behind the flashing, damage spreads fast.
Local weather makes things worse. Lake effect snow piles up in dormer valleys. Freeze-thaw cycles push flashing apart. Wind drives rain under loose edges. By spring, many Willowick homes have water stains near dormer windows.
Common Signs Your Dormer Is Leaking
Water damage shows up in specific ways. Look for these warning signs near your dormers:
- Brown stains on ceiling drywall below dormer windows
- Peeling paint or bubbling on dormer siding
- Damp spots on interior walls near windows
- Mold growth in corners of dormer ceilings
- Water dripping during heavy rain or snow melt
These problems start small. A tiny gap in flashing lets moisture in. Over weeks or months, wood rots. Insulation gets wet. The damage grows until you see visible signs inside your home.
Why Dormer Flashing Fails in Cleveland
Several factors work together to cause dormer leaks. Understanding these helps you prevent problems.
Ice dams form in dormer valleys. Snow melts on warm roof surfaces. Water runs down and refreezes at the cold edge. This creates a barrier. Water backs up under shingles and flashing.
Freeze-thaw cycles stress materials. Water seeps into tiny cracks. When it freezes, it expands. This pushes flashing away from the roof. Each cycle makes the gap bigger.
Wind-driven rain hits dormer walls at an angle. Older flashing may not extend far enough. Wind drives water up under the edges. This happens most often on west-facing dormers during storms from Lake Erie.
Poor installation causes early failure. Step flashing must overlap correctly. Counter flashing needs to extend into the wall. Missing pieces or wrong materials lead to leaks within a few years.

Types of Dormer Flashing and Their Problems
Different flashing types handle stress differently. Here are the main types and their common failure points:
| Flashing Type | Common Failure Point | Why It Happens |
|---|---|---|
| Step flashing | Corrosion at nail holes | Water pools around fasteners |
| Counter flashing | Separation from wall | Building movement or mortar failure |
| Valley flashing | Ponding water damage | Sediment buildup and ice dams |
| Apron flashing | Cracking at bends | Metal fatigue from temperature changes |
Step flashing runs up the dormer wall between shingles. Each piece overlaps the one below. This creates a water-shedding path. But nails rust. Metal corrodes. Pieces pull away from the wall.
Counter flashing folds into the dormer wall. It covers the top of step flashing. Mortar or sealant holds it in place. Over time, mortar crumbles. Sealant fails. Water gets behind the flashing.
Valley flashing sits in the V-shaped area between dormer and main roof. It channels water away. But valleys collect debris. Leaves and twigs trap moisture. Ice builds up here first.
Apron flashing covers the horizontal area where dormer roof meets main roof. It bends around corners. These bends crack over time. Especially in cold weather when metal becomes brittle.
Step-by-Step Dormer Leak Repair Process
Fixing a dormer leak requires removing old materials. Then installing new flashing correctly. Here is the complete process:
- Remove shingles and siding
Start at the top of the dormer. Remove shingles carefully to see the flashing underneath. Take off siding around the dormer walls.
- Inspect and replace damaged wood
Check the roof deck and wall sheathing. Replace any rotted wood. This prevents future problems.
- Install ice and water shield
Cover the entire dormer area with ice and water shield. Extend it up the walls at least 12 inches. This creates a waterproof barrier.
- Install new step flashing
Place step flashing pieces so each one overlaps the one below. Nail only to the roof deck. Never nail through the wall.
- Add counter flashing
Cut counter flashing into the mortar joints or siding. Make sure it extends at least 4 inches into the wall.
- Seal all joints
Use high-quality roofing sealant at all flashing joints. Pay special attention to corners and bends.
- Replace shingles and siding
Install new shingles over the flashing. Replace siding and caulk around windows.
This process takes time. Most dormer repairs need 1-2 days for a professional crew. The exact time depends on the damage extent and weather conditions. EPA mold information.
Cost Factors for Dormer Repairs in Willowick
Several factors affect dormer repair costs in the Cleveland area. Understanding these helps you budget properly.
| Cost Factor | Impact on Price | Typical Range |
|---|---|---|
| Roof height | Higher roofs cost more | 15-30% increase |
| Extent of damage | More rot means higher costs | $500-2,000 additional |
| Flashing material | Copper costs more than aluminum | 2-4x price difference |
| Roof pitch | Steeper roofs take longer | 20-40% labor increase |
Basic dormer flashing repairs start around $800-1,200 in Willowick. This covers simple flashing replacement on a one-story home. More complex jobs cost $2,000-4,000 or more.
Two-story homes need special equipment. Safety harnesses and roof jacks add to the cost. Steep roofs require more time and caution. This increases labor charges.
Wood rot adds significant cost. If the roof deck or wall sheathing is damaged, replacement is necessary. This can double the repair price. Finding hidden rot during the job is common.
Material choice affects both cost and longevity. Aluminum flashing costs less but corrodes faster. Copper lasts longer but costs more upfront. Many homeowners choose the middle ground with galvanized steel.
Preventing Future Dormer Leaks
Prevention saves money and headaches. Here are proven ways to protect your dormers:
- Clean gutters twice yearly. Clogged gutters cause water to back up under flashing.
- Remove snow from dormer valleys after heavy storms. This prevents ice dam formation.
- Check flashing annually. Look for loose pieces, rust, or separation from walls.
- Maintain proper attic ventilation. This keeps roof temperatures even and reduces ice dams.
- Trim trees near dormers. Falling branches can damage flashing and create entry points for water.
Regular maintenance catches problems early. A small repair costs much less than water damage restoration. Many Willowick homeowners schedule annual roof inspections to stay ahead of issues.
Ice and water shield installation during roof replacement provides extra protection. This membrane self-seals around nails. It prevents water from reaching the roof deck even if flashing fails.
Quality materials matter. Use UV-resistant sealants that withstand Cleveland’s temperature swings. Choose flashing thickness appropriate for your roof pitch and local weather conditions.
Local Building Code Requirements
Cuyahoga County and the City of Willowick have specific requirements for dormer flashing. Following these ensures your repair passes inspection.
Ice and water shield must extend at least 24 inches inside the exterior wall line. This covers the area most vulnerable to ice dams. Some local codes require shield in all valleys.
Flashing materials must meet ASTM standards. Minimum thickness is typically 0.019 inches for galvanized steel. Copper flashing must be at least 16 ounces per square foot.
Step flashing pieces must be at least 4 inches wide. They need to extend up the wall at least 4 inches. Overlap between pieces should be at least 2 inches.
Counter flashing must extend into the wall at least 1.5 inches. It needs to cover the vertical leg of step flashing completely. All joints require sealant compatible with both materials.
Permits are required for structural roof repairs in Willowick. The building department reviews plans to ensure code compliance. Inspections occur at different stages of the repair process.
Emergency Steps During Active Leaks
Sometimes leaks happen during storms. You need to minimize damage until professional help arrives. Here are emergency steps:
- Place buckets under active leaks. This protects floors and furniture from water damage.
- Move valuables away from affected areas. Water can spread quickly through ceilings.
- Cover furniture with plastic sheeting. This prevents water stains and mold growth.
- Document the damage with photos. This helps with insurance claims later.
- Call a professional roofer immediately. Many offer 24/7 emergency service in Cleveland.
Never climb on a wet roof yourself. It is dangerous and can cause more damage. Wait for professionals with proper safety equipment.
Temporary patches can help. Roofing tape or sealant can slow active leaks. But these are not permanent solutions. Professional repair is still needed.
Check your attic during rain. Look for water stains on rafters or insulation. This helps identify leak sources for the repair crew.
Insurance Coverage for Dormer Leaks
Homeowners insurance may cover dormer leak repairs. But coverage depends on the cause and extent of damage.
Sudden damage from storms or falling trees is usually covered. Gradual wear and tear is typically not covered. Insurance companies expect homeowners to maintain their roofs.
Water damage inside the home is often covered. This includes ceiling repairs, painting, and damaged personal property. But roof repairs may be your responsibility.
Document everything for your claim. Take photos of the damage. Keep receipts for emergency repairs. Get written estimates from licensed contractors.
Your insurance company may send an adjuster. They inspect the damage and determine coverage. Having a contractor present during this inspection can help ensure nothing is missed.
Deductibles apply to most claims. Make sure repair costs exceed your deductible before filing a claim. Multiple small claims can increase your premiums.
Comparing Dormer Styles and Their Leak Risks
Different dormer styles face different leak challenges. Understanding your dormer type helps with prevention and repair.
| Dormer Style | Leak Risk Level | Common Problem Areas |
|---|---|---|
| Gable dormer | Medium | Valley intersections |
| Hip dormer | High | Multiple slope intersections |
| Eyebrow dormer | Very High | Curved flashing failures |
| Wall dormer | Low | Wall penetration points |
Gable dormers have a triangular roof that meets the main roof at a valley. These valleys collect water and debris. Proper flashing is critical for these designs.
Hip dormers have slopes on three sides. They create multiple intersection points with the main roof. Each intersection needs proper flashing. More intersections mean more potential leak points.
Eyebrow dormers have a curved roof that extends from the main roof. The curved flashing is difficult to install correctly. These often leak within a few years if not done perfectly.
Wall dormers extend vertically from the roof. They have fewer roof intersections. But they create wall penetrations that need sealing. Window frames and siding joints are common problem areas.
Older homes in neighborhoods like Bay Village and Rocky River often have multiple dormer styles. Each requires different flashing approaches. A professional familiar with local architecture can identify potential problems.
When to Call a Professional
Some dormer repairs need professional help. Here are signs you should call a roofer:
- Active leaks during rain or snow melt
- Multiple water stains near dormers
- Visible damage to flashing or shingles
- Wood rot in the roof or walls
- Ice dams forming in dormer valleys
DIY repairs can make problems worse. Incorrect flashing installation traps water. Wrong materials fail quickly. Professional roofers have the tools and experience to do the job right.
Look for contractors with dormer experience. Ask about their flashing techniques. Check references from local homeowners. Make sure they understand Cleveland’s weather challenges.
Get written estimates that detail the work. The estimate should include materials, labor, and timeline. Ask about warranties on both materials and workmanship.
Professional repairs last longer. They include proper underlayment and sealing. This prevents future leaks and protects your home investment.
Finding Dormer Repair Help in Cleveland
Local experience matters for dormer repairs. Cleveland’s weather and building styles create unique challenges. Look for contractors who understand these factors.
Ask about their experience with your home style. Different architectural styles need different approaches. A contractor familiar with your neighborhood can spot potential problems.
Check their licensing and insurance. Ohio requires roofing contractors to be licensed. Insurance protects you if something goes wrong during the repair.
Read reviews from local customers. Look for comments about dormer repairs specifically. See how they handle problems and warranty issues.
Ask about emergency services. Dormer leaks often happen during storms. A contractor who offers 24/7 service can prevent extensive damage.
Get multiple estimates. Compare not just price but also proposed solutions and materials. The cheapest option may not be the best long-term value.
Choose a contractor who communicates clearly. They should explain the problem and solution in terms you understand. Good communication prevents surprises during the repair.

Protecting Your Home Investment
Dormer leaks can cause thousands in damage if ignored. Water destroys insulation, rots wood, and creates mold. These problems affect your home’s value and your family’s health.
Regular inspections catch problems early. Look at your dormers after storms. Check inside near windows for water stains. Pay attention to musty smells in upper rooms.
Maintenance prevents most leaks. Clean gutters, remove debris, and check flashing seals. These simple steps extend the life of your roof and dormers.
Quality repairs protect your investment. Use proper materials and installation techniques. This prevents repeat problems and saves money over time.
Your home is likely your biggest investment. Protecting it from water damage should be a priority. Dormer flashing maintenance is a key part of this protection.
Don’t wait for visible leaks to take action. By then, damage may be extensive. Regular maintenance and prompt repairs keep your home dry and valuable.
Willowick homeowners face unique challenges from Lake Erie weather. Understanding these challenges helps you make better decisions about dormer maintenance and repair.
Professional help is available when you need it. Experienced roofers understand local conditions and building requirements. They can keep your dormers leak-free for years to come.
Take action today if you suspect dormer problems. A small inspection fee can prevent major repair costs later. Your home deserves this protection.
Remember that dormer flashing connects different roof planes. This connection point faces the most stress. Proper maintenance here prevents most roof leaks in Cleveland homes.
Your vigilance and professional help can keep your dormers working properly. This protects your home from water damage and maintains its value for years to come.
Frequently Asked Questions
How long should dormer flashing last in Cleveland?
Quality dormer flashing typically lasts 20-30 years in Cleveland’s climate. Harsh winters and temperature swings can reduce this to 15-20 years. Regular maintenance extends lifespan.
Can I repair dormer flashing myself?
Simple sealant applications might be DIY possible. But proper flashing replacement requires roofing experience. Incorrect installation often causes more damage than the original problem.
How much does dormer flashing replacement cost?
Basic dormer flashing replacement in Cleveland costs $800-1,200. Complex repairs with wood replacement run $2,000-4,000. Two-story homes and steep roofs increase costs by 20-40%.
What causes ice dams on dormer valleys?
Ice dams form when snow melts on warm roof areas, then refreezes at cold edges. Poor attic insulation and ventilation cause uneven roof temperatures. This creates perfect conditions for ice dams.
How can I tell if my dormer flashing needs replacement?
Look for rust, separation from walls, cracked sealant, or water stains inside near dormers. If your roof is over 15 years old, flashing should be inspected annually even without visible problems.
{
“@context”: “https://schema.org”,
“@type”: “BlogPosting”,
“headline”: “Why Dormer Flashing Is the Most Likely Place Your Willowick Roof Will Start Leaking”,
“description”: “Learn why dormer flashing fails first in Willowick homes. Expert guide to leak causes, repair costs, and prevention in Cleveland’s harsh climate.”,
“wordCount”: 2519,
“datePublished”: “2026-02-10T15:42:00.000Z”,
“dateModified”: “2026-02-10T15:42:00.000Z”,
“inLanguage”: “en-US”,
“mainEntityOfPage”: {
“@type”: “WebPage”,
“@id”: “https://alpharoofingcleveland.com”
},
“publisher”: {
“@type”: “LocalBusiness”,
“name”: “Alpha Roofing Cleveland”,
“url”: “https://alpharoofingcleveland.com”
},
“author”: {
“@type”: “Organization”,
“name”: “Alpha Roofing Cleveland”,
“url”: “https://alpharoofingcleveland.com”
},
“image”: {
“@type”: “ImageObject”,
“url”: “https://alpharoofingcleveland.com/wp-content/uploads/2026/03/why-dormer-flashing-is-the-most-likely-place-your-1.jpg”
}
}
{
“@context”: “https://schema.org”,
“@type”: “RoofingContractor”,
“name”: “Alpha Roofing Cleveland”,
“url”: “https://alpharoofingcleveland.com”,
“address”: {
“@type”: “PostalAddress”,
“addressLocality”: “Cleveland”
},
“areaServed”: {
“@type”: “City”,
“name”: “Cleveland”
}
}
{
“@context”: “https://schema.org”,
“@type”: “FAQPage”,
“mainEntity”: [
{
“@type”: “Question”,
“name”: “How long should dormer flashing last in Cleveland?”,
“acceptedAnswer”: {
“@type”: “Answer”,
“text”: “Quality dormer flashing typically lasts 20-30 years in Cleveland’s climate. Harsh winters and temperature swings can reduce this to 15-20 years. Regular maintenance extends lifespan.”
}
},
{
“@type”: “Question”,
“name”: “Can I repair dormer flashing myself?”,
“acceptedAnswer”: {
“@type”: “Answer”,
“text”: “Simple sealant applications might be DIY possible. But proper flashing replacement requires roofing experience. Incorrect installation often causes more damage than the original problem.”
}
},
{
“@type”: “Question”,
“name”: “How much does dormer flashing replacement cost?”,
“acceptedAnswer”: {
“@type”: “Answer”,
“text”: “Basic dormer flashing replacement in Cleveland costs $800-1,200. Complex repairs with wood replacement run $2,000-4,000. Two-story homes and steep roofs increase costs by 20-40%.”
}
},
{
“@type”: “Question”,
“name”: “What causes ice dams on dormer valleys?”,
“acceptedAnswer”: {
“@type”: “Answer”,
“text”: “Ice dams form when snow melts on warm roof areas, then refreezes at cold edges. Poor attic insulation and ventilation cause uneven roof temperatures. This creates perfect conditions for ice dams.”
}
},
{
“@type”: “Question”,
“name”: “How can I tell if my dormer flashing needs replacement?”,
“acceptedAnswer”: {
“@type”: “Answer”,
“text”: “Look for rust, separation from walls, cracked sealant, or water stains inside near dormers. If your roof is over 15 years old, flashing should be inspected annually even without visible problems.”
}
}
]
}
{
“@context”: “https://schema.org”,
“@type”: “HowTo”,
“name”: “How to Repair a Dormer Leak”,
“step”: [
{
“@type”: “HowToStep”,
“position”: 1,
“name”: “Remove shingles and siding”,
“text”: “Start at the top of the dormer. Remove shingles carefully to see the flashing underneath. Take off siding around the dormer walls.”
},
{
“@type”: “HowToStep”,
“position”: 2,
“name”: “Inspect and replace damaged wood”,
“text”: “Check the roof deck and wall sheathing. Replace any rotted wood. This prevents future problems.”
},
{
“@type”: “HowToStep”,
“position”: 3,
“name”: “Install ice and water shield”,
“text”: “Cover the entire dormer area with ice and water shield. Extend it up the walls at least 12 inches. This creates a waterproof barrier.”
},
{
“@type”: “HowToStep”,
“position”: 4,
“name”: “Install new step flashing”,
“text”: “Place step flashing pieces so each one overlaps the one below. Nail only to the roof deck. Never nail through the wall.”
},
{
“@type”: “HowToStep”,
“position”: 5,
“name”: “Add counter flashing”,
“text”: “Cut counter flashing into the mortar joints or siding. Make sure it extends at least 4 inches into the wall.”
},
{
“@type”: “HowToStep”,
“position”: 6,
“name”: “Seal all joints”,
“text”: “Use high-quality roofing sealant at all flashing joints. Pay special attention to corners and bends.”
},
{
“@type”: “HowToStep”,
“position”: 7,
“name”: “Replace shingles and siding”,
“text”: “Install new shingles over the flashing. Replace siding and caulk around windows.”
}
],
“image”: “https://alpharoofingcleveland.com/wp-content/uploads/2026/03/why-dormer-flashing-is-the-most-likely-place-your-1.jpg”
}
{
“@context”: “https://schema.org”,
“@type”: “BreadcrumbList”,
“itemListElement”: [
{
“@type”: “ListItem”,
“position”: 1,
“name”: “Home”,
“item”: “https://alpharoofingcleveland.com”
},
{
“@type”: “ListItem”,
“position”: 2,
“name”: “Blog”,
“item”: “https://alpharoofingcleveland.com/blog”
},
{
“@type”: “ListItem”,
“position”: 3,
“name”: “Why Dormer Flashing Is the Most Likely Place Your Willowick Roof Will Start Leaking”
}
]
}
{
“@context”: “https://schema.org”,
“@type”: “Service”,
“serviceType”: “Roofing”,
“provider”: {
“@type”: “LocalBusiness”,
“name”: “Alpha Roofing Cleveland”,
“url”: “https://alpharoofingcleveland.com”
},
“areaServed”: {
“@type”: “City”,
“name”: “Cleveland”
},
“description”: “Learn why dormer flashing fails first in Willowick homes. Expert guide to leak causes, repair costs, and prevention in Cleveland’s harsh climate.”
}
For more information, visit FEMA ice dam prevention guide.